Category:Sandswept Isles screenshots
From Guild Wars 2 Wiki
Jump to navigationJump to search
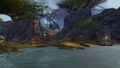
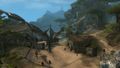
Screenshots of locations within Sandswept Isles.
Media in category "Sandswept Isles screenshots"
The following 60 files are in this category, out of 60 total.
 Anniogel Landing.jpg 1,920 × 1,080; 393 KB
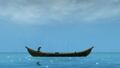 Atholma Boat.jpg 2,560 × 1,440; 229 KB
 Atholma Docks.jpg 1,920 × 1,080; 323 KB
 Atholma.jpg 1,920 × 1,080; 350 KB
 Calon Islet.jpg 2,560 × 1,440; 562 KB
 Cerberus Watchtowers.jpg 2,558 × 1,439; 276 KB
 Chukara Sea.jpg 2,497 × 1,405; 378 KB
 Communications Array.jpg 2,560 × 1,440; 299 KB
 Communications Control.jpg 1,920 × 1,080; 475 KB
 Cove of Zohaqan.jpg 1,920 × 1,080; 1.41 MB
 Dajkah 2.jpg 1,920 × 1,080; 492 KB
 Dajkah 3.jpg 1,920 × 1,080; 629 KB
 Dajkah 4.jpg 1,920 × 1,080; 639 KB
 Dajkah 5.jpg 1,920 × 1,080; 614 KB
 Dajkah.jpg 1,920 × 1,080; 539 KB
 Damos Isle.jpg 1,920 × 1,080; 231 KB
 Deepwater Cooling Sink.jpg 1,920 × 1,080; 143 KB
 Driftwood Jetty.jpg 1,842 × 1,038; 425 KB
 Eastern Complex 2.jpg 2,560 × 1,440; 534 KB
 Eastern Complex.jpg 1,920 × 1,080; 210 KB
 Effluent Outflow Network.jpg 1,920 × 1,080; 456 KB
 Ewyn's Retreat.jpg 1,920 × 1,080; 407 KB
 Gathering Storms.jpg 2,560 × 1,440; 717 KB
 Greytear Falls.jpg 1,920 × 1,080; 520 KB
 Griffonstone Buttresses.jpg 2,560 × 1,440; 614 KB
 Invariant Enclave.jpg 1,920 × 1,080; 226 KB
 Invariant Entrance.jpg 2,560 × 1,440; 1,007 KB
 Jemandi Market.jpg 1,920 × 1,080; 449 KB
 Lab Sigma-05.jpg 1,920 × 1,080; 598 KB
 Leyfinder Research Facility (lower level).jpg 1,920 × 1,080; 504 KB
 Leyfinder Research Facility (upper level).jpg 1,920 × 1,080; 500 KB
 Leyfinder Research Facility.jpg 1,920 × 1,080; 285 KB
 Magistorm Gallery.jpg 1,920 × 1,080; 218 KB
 Magnetics Lab.jpg 1,920 × 1,080; 313 KB
 Malor's Ranch.jpg 1,920 × 1,080; 488 KB
 Necrobrand Emulation Lab.jpg 1,920 × 1,080; 412 KB
 Northern Complex Coves.jpg 1,920 × 1,080; 364 KB
 Olma's Legacy.jpg 2,509 × 1,411; 541 KB
 Portalforge Lab.jpg 1,920 × 1,080; 435 KB
 Rata Primus 2.jpg 2,560 × 1,440; 286 KB
 Rata Primus Canal.jpg 1,920 × 1,080; 325 KB
 Rata Primus.jpg 2,560 × 1,440; 221 KB
 Reserve Generator Site.jpg 1,920 × 1,080; 496 KB
 Reserve Power Core.jpg 1,920 × 1,080; 315 KB
 Ritual Grounds.jpg 1,920 × 1,080; 223 KB
 Sargol Sea.jpg 1,920 × 1,080; 601 KB
 Skycavern Burial Grounds.jpg 1,920 × 1,080; 820 KB
 Specimen Chamber.jpg 1,920 × 1,080; 525 KB
 Strait of Panube.jpg 1,920 × 1,080; 279 KB
 The Hunting Grounds.jpg 1,920 × 1,080; 420 KB
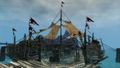
 The Iron Whale.jpg 1,920 × 1,080; 373 KB
 The Ruined Paths 2.jpg 2,521 × 1,418; 1,014 KB
 The Ruined Paths.jpg 2,560 × 1,440; 1.07 MB
 Tunnel Access Alpha.jpg 1,920 × 1,080; 203 KB
 Tunnel Access Beta.jpg 1,920 × 1,080; 198 KB
 Tunnel Access Delta.jpg 2,550 × 1,434; 700 KB
 Tunnel Access Epsilon.jpg 1,920 × 1,080; 458 KB
 Tunnel Access Gamma.jpg 1,920 × 1,080; 329 KB
 Tyrulu Sea.jpg 2,560 × 1,440; 400 KB
 Western Complex.jpg 2,560 × 1,440; 502 KB


.jpg)
.jpg)


