User:Endaris/Trebuchet Reference
On this page I'll try to gather information about Trebuchet spots that are common, popular or good to know about. It's also a bit of a personal research project that will expand as I learn about good trebbing spots myself.
With their huge range it can be difficult to figure out what hits where, especially where it involves shooting at targets outside your line of sight.
If you see a trebuchet ingame you can't find here, please don't just blindly add it but rather ponder the pro and contra, ease of access / building location and other tactical factors.
You can obviously place a trebuchet anywhere in WvW, this page is primarily for trebs that generally provide a tangible advantage over other spots and siege. Please post on the talk page first if you're unsure about the merit of a new treb spot!
Winning trebuchet battles[edit]
Trebuchet users will inevitably get into treb battles where an offensive treb is built to target a defensive one or a defensive one is built or turned to target an offensive one.
At the core of trebuchet battles is that trebuchet projectiles only deal damage and knockback if the operator is on the treb in the moment it lands. If you get knocked off right before your own shot lands, you lose and if you cannot get knocked off your chance of victory is greatly increased.
Trebuchet battles are decided by 4 factors:
- Altitude difference
- Stability
- Whoever hits first
- Shield Generators
Altitude difference[edit]
Altitude difference can be absolute. Trebs shooting at the Alpine NE tower from the camp cannot even hit defending trebuchets because the shot does not go high enough.
Otherwise being on higher ground is usually highly advantageous. With an altitude advantage you need to charge less for your hit, making your shot land earlier.
After having knocked them out of the trebuchet once, your advantage is almost absolute because your next shot is guaranteed to land before theirs as well, locking them into a cycle of getting hit before their shot lands or even before they can finish charging.
Stability[edit]
Stability will prevent you from getting knocked off your trebuchet. If you see an incoming shot that you think will hit, proactively leave the trebuchet, apply stability to yourself and reinteract with it to make sure your shot's damage is not prevented. Nearby players should proactively support trebuchet operators with stability if they see incoming shots.
If the enemy gets knocked back on the first exchange and you don't, you may gain enough of a tempo advantage to overcome an altitude disadvantage that would normally make you lose the treb battle.
If you don't have stability readily available, make sure you know where your stunbreak is and just mash it as you see the enemy shot landing. The stunbreak will cancel most of the knockback so that you can immediately use the trebuchet again to secure your own shot.
Whoever hits first[edit]
Unless you know your stuff by experience, trebuchet operators often need 1-2 shots to get the distance right. Being able to hit first is often deciding as you get the initial knock off and possibly a canceled charge or shot and can push your advantage from there.
And then there's also just getting to shoot first because you built your trebuchet earlier or faster. It is fairly easy to just shoot down a build site even in disadvantaged positions.
Shield Generators[edit]
If they can't hit your trebs, they can't win the war. They might still be able to hit the Shield Generators though. If it's a max range pull without altitude disadvantage or there is other terrain to keep the shield generators out of harm, it's an auto win if you have 2 of them and 2 people who competently alternate bubbles.
Trebuchets pop within 3-4 shots of each other so if you intend to support your trebuchet with a shield generator it is often better to build the shield generator first as they are less visible in the distance.
Trebuchet locations[edit]
IDs are intended to crossreference other trebs between entries to point out counter treb locations and alternatives. The prefixes are D is for defensive, O for offensive. They don't have any meaning, please don't change them.
Missing pictures will be added when I end up on the correct team and find situations where I can conveniently optimize placement and map out ranges for the ideal screenshots without actively trolling my team by wasting supply or getting constantly interrupted.
Offensive Trebuchet Locations[edit]
The user column generally indicates a minimum size of a group to use the treb effectively. If a trebuchet is indicated as suitable for roamers, it is implied that any bigger groups can also use it effectively.
| ID | Map | Target | Origin | Image | Shooting Force (%) | Users | Notes |
|---|---|---|---|---|---|---|---|
| O001 | Desert | Blistering Undercroft Outer | McLain's Encampment | File:User Endaris O001 Trebuchet.jpg | 0 | Green roamers | Have a friend stay on lookout and wait for enemy roamers to come to play as you treb.
If someone comes up, leave the treb and meet them at the end of the slope rather than fighting them on the treb to deny gliding advantage and eliminate the risk of getting pushed down. If none comes you can hit the wall further to the right or the gate to inflict higher repair damage as you call in people to make a push for inner. If someone builds a countertreb, turn your treb and shoot at ~10% force to hit the ledge. You have the high ground and your shot is slightly easier than theirs so you will usually win this. |
| O002 | Desert | Osprey's Palace Outer | Bauer Farmstead | 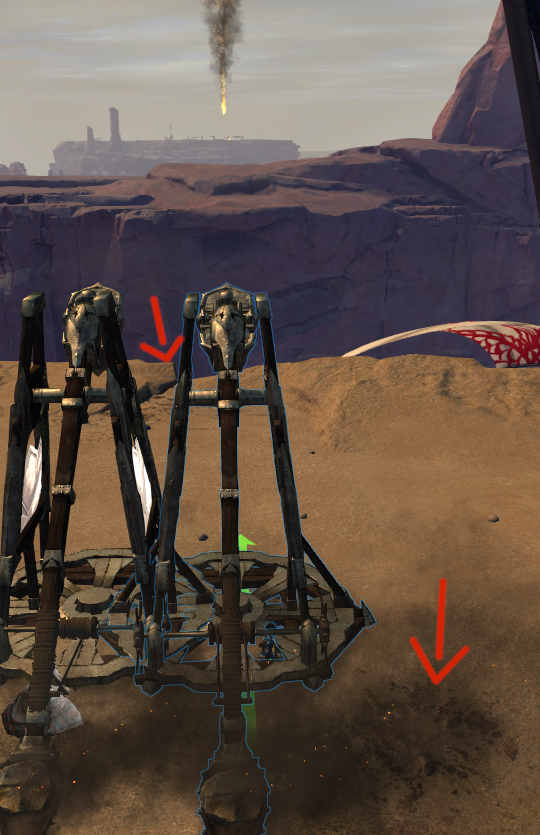
|
100 | Blue roamers / havocs | Build the treb a bit away from the cliff so you can just hold down for 100%. You can use the marked scorchmark on the ground to orient how far back to build. The notch in the ledge can serve as an aim help for this position.
If it's built right at the cliff you need 90% instead as the shot otherwise crashes into the cliff face behind the wall before dropping low enough. Easy to keep an eye on the platform leading into the camp, you are within aggro range of friendly camp NPCs and you have gliding advantage towards the sentry to escape outnumbered assaults. One big advantage for small groups is that you can easily resupply once the wall is down to assault inner with a bigger number of catapults. TODO: Figure out where to place and how much to charge to hit the supply depot behind the gate to drain supply before an assault. The falling angle of the treb shot is steep enough that it should be possible without getting stuck in the terrain above the gate. |
| O003 | Alpine | Greenlake / Redlake | Askalion Hills / Shadaran Hills | 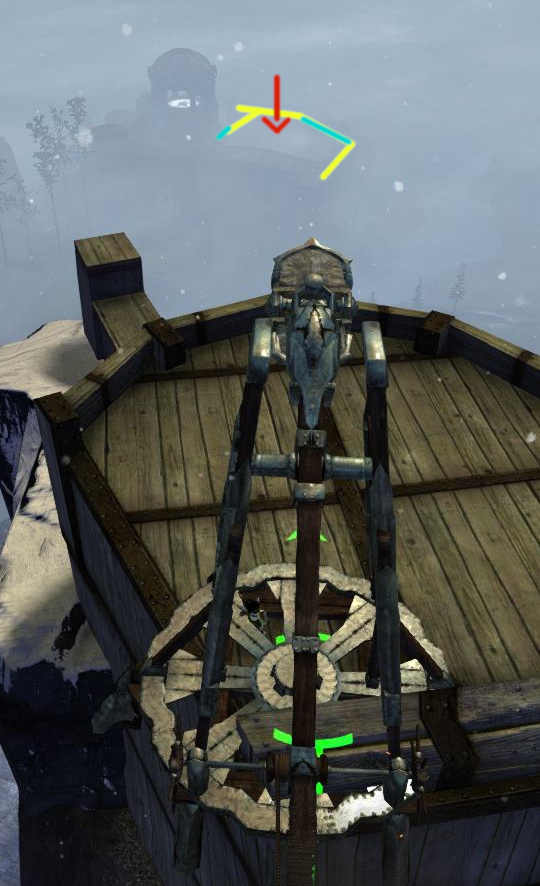
|
100 | Home map roamers | Relatively safe location. Aim for the yellow backwall and around the red arrow to hit both of the damageable walls (cyan).
Can be turned to defend against assaults on the double cata walls further away from it. |
| O004 | Alpine | Askalion Hills / Shadaran Hills Outer | Greenwater Lowlands / Redwater Lowlands | File:User Endaris O004 Trebuchet.jpg | 100 | Spawnside havocs/zergs | Very slow to open because it targets a gate.
It is mainly useful if the eastern wall is heavily fortified by siege and you are confident you win open field fights against the defenders. O003 can easily be turned to target this but the wall acts as natural protection for shield generators that can cover attacking trebs, forcing defenders to either come out to directly assault the location or surrender the gate. |
| O005 | EBG | Jerrifer's Slough | Green World Lowlands | File:User Endaris O005 Trebuchet.jpg | 100? | Zergs | Allows to attack the inner double wall before breaking the outer, putting pressure on defenders to attack and recapture instead of relying on defensive siege.
Most effective when combined with a parallel assault on outer as defenders will often split up in multiple groups that end up too low-numbered to achieve any of the necessary objectives to break the siege, even if the attacking group does not have a numbers advantage. |
| O006 | Alpine | Cragtop / Dawn's Eyrie | Foghaven / Stargrove | File:User Endaris O006 Trebuchet.jpg | 100 | Havocs | Aiming for the torch at the bottom of the ramp allows hitting the north and southeast facing walls at the same time.
Easily counter trebbed, relies on sneak/surprise factor by avoiding Marked (Watchtower) and/or shield generators. This spot is primarily good due to being near the camp, allowing havoc groups to easily build five trebs and open the tower quickly before defenders can react. By resupplying before moving into the tower, havocs can still afford to build Ballistas in the tower after opening to deter defenders that try to fly in from spawn to stall for reinforcements which is otherwise a typical problem when trying to cap this tower with smaller groups. |
| O007 | Alpine | Ascension Bay / Dreadfall Bay Outer | Blue Alpine Garrison / Green Alpine Garrison | 
|
100 | Home map roamers | Reachable by gliding from the garrison's inner west gate only, this spot allows to open the northern Moa wall or the northeast gate effectively uncontested.
Defenders are forced to build counter siege in close proximity to deny this trebuchet. The location you want to aim at for the Moa wall is showcased on the screenshot, there's barely any room to shoot further left or right, trebuchet mastery rank 3 may be required to land the shot. |
Defensive Trebuchet Locations[edit]
Like catapults, trebuchets can be built preemptively to hit any gate from the inside to damage and knockback attackers using rams. Throw a  Siege Disruptor before the first shot to also destroy the rams for best effects.
| ID | Map | Location | Image | Notes |
|---|---|---|---|---|
| D001 | EBG | Green World Lowlands | File:Endaris D001 Trebuchet.jpg | A defensive treb defending attacks on and from Jerrifer's Slough. If it is not placed and the enemies left, it is the lawful good way to open it for a recap thanks to the protection it continues to offer after capture.
100% Shooting Force to reach the gate 100% Shooting Force to counter an attacking treb on the platform behind the lord room 90% to hit wall and gate at the same time when opening 70% to hit just the wall Numbers to be verified when mapping taking the screenshots. |