User:Tery3065/sandbox5
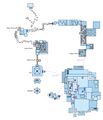
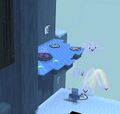
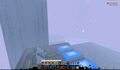
Overview map
- Storm Top overview 1 diagram.jpg
Starting mountain
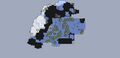
- Storm Top overview 2 map.jpg
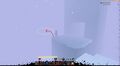
Hard path
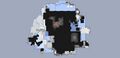
- Storm Top overview 3 map.jpg
Boss arena
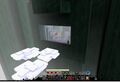
- Super Adventure 2-3 map.jpg
Super Adventure 2-3

Floor 1: Starting area
Floor 2: Checkpoint #1-3
- Storm Top 2.5 map.jpg
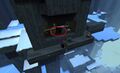
Floor 2.5: Checkpoint #3
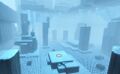
- Storm Top 4 map.jpg
Floor 4: Central area
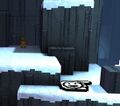
Checkpoint #4 - Storm Top 3 map.jpg
Floor 3: Western side
Portals - Storm Top 5 map.jpg
Floor 5: Top floor
- Storm Top 5-6 map.jpg
After portal-CP5-6
- Storm Top 6-7 map.jpg
CP6-7 (slippery spikes)
- Storm Top 7-8 map.jpg
CP7-8 (icy hill)
- Storm Top 8-9 map.jpg
CP8-9 (cloud, bridge)
- Storm Top 9-10 map.jpg
CP9-10 (angry clouds-spikes)
- Storm Top 9-10-1 map.jpg
CP9-10 spikes, floor 1
- Storm Top 9-10-2 map.jpg
CP9-10 spikes, floor 2
- Storm Top 10-11 map.jpg
Yeti arena
- Storm Top 11 map.jpg
Storm Wizard arena


Storm Top[edit]
Walkthrough[edit]
- For Tribulation Mode, see: Storm Top/Tribulation Mode
| Search YouTube for videos related to World 2 Zone 3. |
| Search YouTube for videos related to World 2 Zone 3 Tribulation Mode. |
Overview[edit]
- Requirements
- In order to collect all Baubles, Hidden Rooms, and Furniture Shops, players must have:
 Glove of Wisdom.
 Mini Bomb.
 Wooden Whistle with the Gatekeeper Lullaby
  3 3 2 3 3 1 from the last hidden room in Pain Cliffs.
- Notes: Reaching one of the baubles requires a dodge jump (pressing dodge and jump at the same time).
- Checkpoint list
-
- Starting mountain
- 0. Floor 1 north: Starting area
- 1. Floor 2 southwest: After the leaning Cliff Face ramp
- 2. Floor 2 southeast: The candle is too weak!
- 3. Floor 2 northwest: At the end of a long icy platform with blowing Cliff Faces and exploding barrels
- 4. Floor 4 center: Push Block and Ooze Farmer room
- Hard path
- 5. After the first light puzzle
- 6. Before the slippery spikes
- 7. After the second light puzzle
- 8. After the icy hill, before the bridges and clouds
- 9. Middle of the storm, before the three bears and the cloud sequence
- Boss arena entrances
- 10. Entrances to the yeti mountain
→10a. Easy path entrance (from Checkpoint# 4)
→10b. Hard path entrance (from Checkpoint# 9) - 11. Entrance to the Storm Wizard arena
- Achievements
 Master of Baubles, World 2 — There are a total of 63 baubles, 5 of them can be found inside the Locked Chests.
- Master of Coins, World 2 — Super Adventure 2-3 is located at the top floor of the starting mountain (after #Checkpoint 4).
- Master of Decor, World 2 — There are a total of 2 Hidden Furniture shops, next to the second light puzzle (#?@!) and under the yeti mountain (Under the pyramid of pain).
- Master of Secrets, World 2 — There are a total of 17 Hidden Rooms.
 Ooze Herding — Between Checkpoint #3 and Checkpoint #4, the Oozes are right next to a Portal before Checkpoint #4 and the ooze farmer is sitting on the cliff right next to the checkpoint.
- Professional Ice Skater — Complete the zone without being frozen by a banana.
- Unintended Coursework — Glitch is located between Checkpoint #9 and Checkpoint #10, it requires the Gatekeeper Lullaby 3 3 2 3 3 1.
Overview map
- Storm Top overview 1 diagram.jpg
Starting mountain isometric diagram
Start-Checkpoint #4 - Storm Top overview 2 map.jpg
Hard path map
Checkpoint #5-9 - Storm Top overview 3 map.jpg
Boss arena map
Checkpoint #10-11
Starting Area to Checkpoint 1 (Floor 1)[edit]
- There is a shopkeeper at the start that sells health refills; see below for vendor details.
 #1 in on the ground before the third tree.
- Head towards the Cliff Face ramp. Checkpoint #1 is right in front of you after the ramp.
- (Optional) For
 #2, stop at the top of the ramp, on your left, leaping to a smaller platform and then either jump around the corner to the other snowy ledge or straight across to a bauble.
 - (Optional) For #3, stop at the top of the ramp, on your right, dropping to the platform below, a yellow bauble is next to a pine tree.
- (Optional) For
- (Optional) Head towards the labyrinth, look for the two hillbillies are located, right side of the ramp. Several raccoons will come and steal some baubles from them.
- (Optional) For
 Stump and Digging spot #1.
- Following raccoons will lead you to a Raccoon Kingpin, along with a Stump.
- Avoid the falling icicles in the ceiling and the Ice Spikes on the ground, they take half a heart.
- If you know the Shatter Serenade 1 3 3 1 3 3 already, you can permanently disable the icicles.
- Digging spot #1 is after your first jump over ice spikes, jump along the right cliff faces side to a platform. (A)
- Following raccoons will lead you to a Raccoon Kingpin, along with a
- (Optional) For #4,
 Hidden Room #1, Digging spot #2, and Stump.
- From the labyrinth entrance, stick to the left wall, avoiding the falling icicles, and jump up a small platform to #4.
- Jump down from that, again keeping to the left wall until you can go no further. The wall is the closed mouth of a Cliff Face. Play 3 3 2 3 3 1 to open the wall. (B)
- Climb up the various ledges until you reach the top of the room, where you will find a small passage to another tall room.
- Drop down to the bottom level, just make sure you do not fall out into the void. From that level, before the snowy platform and the polar bears. (C)
- (Optional) For Digging spot #2, take the left path and dig in the back corner.
- Head towards the snowy platform which will reveal a room with two polar bears. Take care of them and continue until you reach the back wall of the room.
- Facing the back wall, turn right and throw a bomb at the corner to your right to reveal Hidden Room #1 (Master of Secrets, World 2: A cave underneath the ice).
- Use the Glove of Wisdom to open the wall.
- Stump is on your left, from here, you can attacks it with
 Slingshot without spawning the Raccoon Kingpin then jump to it afterwards.
- From the labyrinth entrance, stick to the left wall, avoiding the falling icicles, and jump up a small platform to
- (Optional) For
Floor 1: Starting area

(A) Digging spot #1
- Storm Top Hidden Room 1.jpg
(B) Hidden Room #1:
A cave underneath the ice (entrance) 
(C) Digging spot #2 (left)
Hidden Room #1 (right)


Shop #1 items[edit]
| Item | Cost | Description |
|---|---|---|
| 300 |
Health refills restore two hearts. | |
| 5 |
Restores one heart. | |
| 250 |
Plays three notes. |
Checkpoint 1 to Checkpoint 2 (Floor 2 South)[edit]
- (Optional) From the Checkpoint #1, turnaround, go right and use a bomb to reveal Hidden Room #2 (Master of Secrets, World 2: A roundabout secret). There is nothing in there but falling icicles, and another exit on the left side in the far end of this room.
- Jump up towards an area with a polar bear. (or use the rainbow bridge for Exploration Mode)
- Jump towards the second checkpoint, stopping just before it for the shop Hidden Room #3 (Master of Secrets, World 2: The candle is too weak).
- Purchase a
 Key (#1). It will be used soon.
 - If you are playing on Normal Mode and you do not have the
 Torch, you will need to purchase it in this shop to finish the zone. It is not needed if you are playing on Exploration Mode.
- Purchase a
- Use Torch or play the Shatter Serenade 1 3 3 1 3 3 to break the Frozen Waterfall and triggers the Checkpoint #2.
- You may have to drop your key before using your torch.
- If you are playing on Exploration Mode, you can use the rainbow bridge to pass this waterfall.
Floor 2 map

Hidden Room #2:
A roundabout secret- Storm Top Hidden Room 3.jpg
Hidden Room #3:
The candle is too weak (Shop #2)

Shop #2 items[edit]
| Item | Cost | Description |
|---|---|---|
| 325 |
Dig anywhere for a 15% chance to find buried treasures. | |
| 5 |
Restores one heart. | |
| 400 |
Create light and heat; damages foes. | |
| 20 |
Grants one extra life. | |
| 25 |
Used for opening chests. |
Checkpoint 2 to Checkpoint 3 (Floor 2 North)[edit]
- Head forward to an area with a polar bear is guarding the
 Locked Chest #1 (
 #6-7).
- (Optional) For #8-9, and Hidden Room #4 (Shop #3).
- From Locked Chest #1, turn to face the opposite direction and jump to the small ledge between the two walls. From that ledge, head to ledge on your right, carefully dropping down from it, then jumping up the ledges in front of you for #8.
- Drop down from there and make a "U" shape to another yellow bauble #9. This yellow bauble is visible from the checkpoint, it is down on the ice, near the Bananas.
- In the far corner there is a gap that is not icy: jump up those ledges and use a bomb to break the wall to reveal Hidden Room #4 (Master of Secrets, World 2: Tucked away after a checkpoint). It is Shop #3. (A)
- From Locked Chest #1, turn to face the opposite direction and jump to the small ledge between the two walls. From that ledge, head to ledge on your right, carefully dropping down from it, then jumping up the ledges in front of you for
- Continue forward until it reaches an icy area that has walls that blow wind and
 exploding barrels at the end, with ice ground.
 - Carefully make your way across to towards the Checkpoint #3 to get four blue baubles #10-13.
- For Exploration Mode, you can skip this checkpoint as you may want to respawn to Checkpoint #2 for a Key multiple times.
- For Normal Mode and optional for Exploration Mode, you can use the following mechanic to bring your key back to checkpoint:
- If you fall into the void with a key equipped with and have more than one
 Heart left you will retain the key.
 - If you fall and die (no hearts left) then the key is destroyed.
- If you fall into the void with a key equipped with and have more than one
- For Exploration Mode, you can skip this checkpoint as you may want to respawn to Checkpoint #2 for a
- (Optional) For #14, #15, and
 Digging Spot #3. (B)
- Back to where first of the four blue bauble was (#10), on the snowy patch, and drop down to find #14.
- Continue further towards the wall, you will see a small drop and two rooms with doors that open with the Glove of Wisdom.
- The room to the right has the Digging Spot #3. It does not count towards the bauble collection achievement.
- Head to the room to the left, open the wall with the Glove of Wisdom and grab the yellow bauble sitting on a ledge #15 (C). Jump off to the void to return to checkpoint.
- Back to where first of the four blue bauble was (
- (Optional) Before progress to the next part, you can purchase a Key (#2) for the next chest.
Floor 2 map
- Storm Top Hidden Room 4.jpg
(A) Hidden Room #4:
Tucked away after a checkpoint (Shop #3) 
(B) Path to Bubbles #14-15 and Digging spots #3-4
(C) Bubble #15 and Digging spot #4


Shop #3 items[edit]
| Item | Cost | Description |
|---|---|---|
| 325 |
Dig anywhere for a 15% chance to find buried treasures. | |
| 25 |
Used for opening chests. | |
| 500 |
This tote bag will allow you to hold up to 750 baubles. | |
| 5 |
Restores one heart. | |
| 20 |
Grants one extra life. |
Checkpoint 3 to Checkpoint 4 (Floor 2 West)[edit]
- From Checkpoint #3, continue forwards until you reach a portal. Use it to teleport to a platform with several oozes and a blue bauble #16. (A)
- For Ooze Herding, the Ooze Farmer is just before the Checkpoint #4. You may ignore oozes you see for now and transport it after reaching checkpoint.
- Continue forwards and jump inside the open wall to get inside a room.
- (Optional) Use the portal below to reach the top exit of this room. And dropping down to collect the bubbles.
- (Optional) Digging spot #5 is on the right corner of the entrance. (B)
- (Optional) Climb all the way up to the top.
- #17 is just in front of the entrance.
 #18 is on the center pillar.
- #19 is in the corner before closing to the exit.
- Storm Top 2.5 map.jpg
Floor 2.5 map
(A) Ooze location

(B) Digging spot #5
Ooze Farmer location


Checkpoint 4[edit]
- This section is about the area after the Checkpoint #4 and the top of the mountain before the choices to either hard path Checkpoint #5 or easy path Checkpoint #10.
Floor 4: At the Checkpoint #4[edit]
- If you have a Key (#2) in your hand, drop it next to the checkpoint, as you do not need it yet and it is safe here.
- For Exploration Mode, run up the rainbow bridge and go past the portal into the open wall space.
- For Normal Mode, keep using the Glove of Wisdom on the symbol to push the Block #1 with a portal on top until it locks into place. Use the portal it will teleport up into the open wall space.
- Drop down to the first ledge then head to the wall on your right, and drop down from it to a platform with the #20.
- Drop down to the bottom level and use the Glove of Wisdom to open the wall. (Floor 3)
Floor 3: Portal block puzzles[edit]
- At the opening.
- (Optional) For Digging Spot #6, turn left and jump on the ledges around the corner and dig at the end of the platform.
- For Exploration Mode, the Happy Cloud in front of you can reach all the way up to the top floor but instead, pass over the first Happy Cloud and jump from the second Happy Cloud to the snowy platform ahead, the one on the right side and with a portal.
- If you are doing the Explorer's Second Super Adventure achievement, the areas here will go from 4 to 7 due to Areas 5 and 6 of Exploration Mode activating while hitting the second and third Happy Clouds from taking the initial Happy Cloud, found just after entering the icy area after using the Glove of Wisdom to open the wall and heading upwards.
- For Normal Mode, turn right from the opening, drop down and you will see another Block #2 with a portal on top, use the Glove of Wisdom, carefully jump into it.
- (Optional) For
- At the hilltop with goats, after the Block #2 portal.
- (Optional) For Digging Spot #7, down to the snow beneath the portal and dig.
- Jump up the snowy ledges to enter the second portal.
- (Optional) For
- After teleport from the hilltop with goats, angle your camera bit to the right to see the #21. Jump to reach it and return to the snowy platform.
- From there head straight to the Frozen Waterfall and destroy it with either Torch, the Shatter Serenade 1 3 3 1 3 3, or with a Special Jugs from a hillbilly shop next to it, being careful of the wall that is blowing winds.
- (Optional) For Digging Spot #8, go around the cliff to the left of the frozen waterfall to find a shop with a hillbilly selling Special Jugs. Dig in the middle of his shop.
- (Optional) For
- After the frozen waterfall, make a right to find another Block #3 with a portal on top. Keep using the Glove of Wisdom on the symbol to push the block until it locks into place. Jump into the portal.
- You will get teleported to an icy ledge with another Block #4. Once again, push it until it locks into place while being careful not to slip over the edge. Use it to jump inside the open wall. Collect the #22.
- Before using the portal, open the wall with the Glove of Wisdom to unlock a shortcut to the Checkpoint #4. You will have to get here multiple times, the following guide will use Shortcut Portal for this portal.
- Take the Shortcut Portal. It will teleport you to the top floor and from here, it is possible to take two different paths:
Floor 5: Top floor southern path[edit]
- After the Shortcut Portal, head to the right (south), a ledge with an icy platform, spikes and bananas.
- (Optional) For Super Adventure 2-3, Gourdon the Racing Choya is on a column above—this will force you to play the hard path (Checkpoint #5-9)
- (Optional) For Digging Spot #9, fall down from the exit of the portal to gray platform, then jump across to ice. Find opening in wall and jump down. Dig at bottom.
- For #23 and #24 (Locked Chest #2).
- Climb up the snowy cliffs to get onto the icy ledge and keep going forward to collect a #23 next to the middle pillar.
- Continue towards the grey pillar located in the corner and drop down to the icy ledge below.
- Turn left and notice a few small ledges on a wall which allow you to jump into an open wall. Get inside the room and open the wall below with the Glove of Wisdom to reveal the area where Checkpoint #4 is.
- Grab the Key (#2) you left next to this checkpoint and use it to open the Locked Chest #2 and receive a #24.
- Use the Shortcut Portal you unlocked earlier.
- Climb up the snowy cliffs to get onto the icy ledge and keep going forward to collect a
- For Hidden Room #5-6 and Digging Spot #10.
- Take the top floor southern path again, the one with the spikes and the Bananas. Drop down to the other icy ledge again.
- This time, turn around, head to the base of the pillar and look for a small area where snowy ground connects with the wall of the icy ledge you have just jumped from.
- Throw a bomb at the wall of the pillar to reveal Hidden Room #5 (Master of Secrets, World 2: Before a portal).
- Digging Spot #10 is just in front of the Hidden Room #5.
- This hidden room is the top section of Hidden Room #3 (Shop #2). If you happen to fall down by accident before making the tricky jump mentioned later, the fastest way to get back here is to exit the shop, jump to the void, lose one heart and respawn in Checkpoint #4 to go again through the Shortcut Portal.
- Jump to the ledge to your right and keep going counterclockwise around the room until you are on a ledge between two icy sections.
- Throw a bomb at the wall (it is a square with a different texture than the rest of the wall) to reveal Hidden Room #6 (Master of Secrets, World 2: Don't look down). The way to enter the room is a tricky jump from the higher icy ledge.
- From the Hidden Room #6 entrance.
- (Recommended) You will notice a yellow bauble in the other corner of this room—do not bother with it nor dropping down, we will come back to this room later.
- Turn around to Hidden Room #5 and fall all the way down to Hidden Room #3 (Shop #2). Purchase a Key (#3) here and leave the shop.
- With a Key (#3) in your hand and have more than one Heart left, jump to the void to quick respawn at the Checkpoint #4. Drop your Key (#3) here, it will later be used.
- Continue the area from the top floor northern path.
- Turn around to Hidden Room #5 and fall all the way down to Hidden Room #3 (Shop #2). Purchase a
- (Optional) For Digging Spot #11-12.
- For Digging Spot #11, from Hidden Room #6 entrance, go forward onto ice platform, and fall off far side onto ice platform of lower level. Dig in corner of ice platform.
- For Digging Spot #12, from Hidden Room #6 entrance, immediately turn to the right and fall down onto the next ice platform. In the back right of this platform is a hole. Fall through this hole onto a ledge, and then step down onto the square ledge below, and dig.
- Getting these two digging spots are not recommended as you will have to get here multiple times and your bag will be likely not enough to hold for every bauble you found in this zone.
- Inside this room, there are also the #31-32 as well as the portal to the Checkpoint #5. (see: #baubles 31-32)
- For
- (Recommended) You will notice a yellow bauble in the other corner of this room—do not bother with it nor dropping down, we will come back to this room later.
Floor 5: Top floor northern path[edit]
- After the Shortcut Portal, head to the left (north), an icy ledge with two portals.
- (Optional) For hard path, use a portal with a sad face
 Helping Hand. (see: #Checkpoint 5)
 - (Optional) For direct path to boss (easy path), use a portal with a happy face
 Helping Hand. (see: #Checkpoint 10)
- If you are doing the achievements, ignore these portals for now.
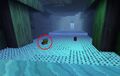
- For Hidden Room #7-8, #25, #26-28, #29.
- Head around to the right corner and look down to spot a polar bear guarding a blue bauble #25, jump down and take the bauble.
- It is not advised to fight it due to the spikes on the platform so as soon as you land and get the bauble, turn the other way and run off the ledge.
- Continue straight down off ledges, in the far distance down you will probably see the big icy ledge leading to Checkpoint #3, the one with the walls that blow winds and the exploding barrels.
- Make sure you land near the wall underneath you, on a somewhat narrow icy ledge just above the level.
- Play 3 3 2 3 3 1 to open a wall and reveal the Hidden Room #7 (Master of Secrets, World 2: Perform a melody on a slippery corner). Collect the three baubles inside #26-28 and exit the hidden room.
- Head back out and go left and then straight, towards a snow platform
- Play 3 3 2 3 3 1 again to reveal Hidden Room #8 (Master of Secrets, World 2: Perform a melody on a ledge above exploding barrels) and get the bauble inside #29.
- Exit the hidden room and jump back to get back to Shop #2 or #3. Purchase another Key (#4) and leave the shop.
- Return to Checkpoint #4 and drop your new Key (#4) there for a total of two safeguarded Keys (#3-4).
- Head around to the right corner and look down to spot a polar bear guarding a blue bauble
- For Digging Spot #13.
- Go as if you are going to Hidden Room #7, but instead of going into the room, look to your right to see a snowy platform. Drop down to it for the digging spot.
- For #30.
- Take the top floor northern path again. This time do not go up to the icy ledge with the two portals.
- Jump on the two snowy ledges then down to the icy section ahead of you. Jump up into the wall with the open section, drop down to the bottom and open the wall with the Glove of Wisdom.
- Head to the right and carefully traverse the narrow ledges until you find a #30. Now, jump to the void to return quickly to Checkpoint #4.
- For #31-32 and to bring the Keys to hard path chests.
- Pick up one of the Keys (#3) at the Checkpoint #4 and take the Shortcut Portal.
- Take the top floor northern path again, but this time you drop down directly off the ledge to collect a #31.
- This is the yellow bauble that we did not pick up when we entered Hidden Room #6.
- Turnaround from that bauble and head straight to jump to a section below with another polar bear.
- Jump down again to collect the second bauble of this room #32.
- From #32, look around to find a portal nearby, which will take you to the hard path, an area with a polar bear and an icy bridge.
- In front of you is Checkpoint #5—do not bother with it yet, you still leave one of your key behind.
- In front of you is Checkpoint #5—do not bother with it yet, you still leave one of your
- Drop the Key (#3) in this area, then jump off to the void to return to Checkpoint #4.
- Pick up the other Key (#4) there and use the Shortcut Portal to get to the top floor north path again, up to the icy edge with the two portals.
- Use the one that is the farthest away from you (north), the one that has a sad face Helping Hand. (see: #Checkpoint 5)
- Pick up one of the
- Storm Top 4 map.jpg
Floor 4: Central area
(Checkpoint #4) - Storm Top 3 map.jpg
Floor 3: Portals and Hidden Rooms
- Storm Top 5 map.jpg
Floor 5: Top floor
- Super Adventure 2-3 map.jpg
- Storm Top Hidden Room 5.jpg
Hidden Room #5:
Before a portal - Storm Top Hidden Room 6.jpg
Hidden Room #6:
Don't look down - Storm Top Hidden Room 7.jpg
Hidden Room #7:
Perform a melody on a slippery corner - Storm Top Hidden Room 8.jpg
Hidden Room #8:
Perform a melody on a ledge above exploding barrels 
Digging spot #6

Digging spot #7
Digging spot #8

Digging spot #9

Digging spot #10

Digging spot #11

Digging spot #12

Digging spot #13


Checkpoint 5 to Checkpoint 6 (Hard Path)[edit]
- Getting there
- From the Checkpoint #4, by the portal at the top of the mountain.
- From the Checkpoint #4, by the portal inside the Hidden Room #6.
- At the portal
- At this point, you should have two Keys (#3-4) as there will be two remaining chests along the hard path. Otherwise:
- (Optional) Return to Checkpoint #4, and Shop #2 or #3 in order, then quick transport the Keys here.
- (Optional) Get the Keys from Shop #4 near the Checkpoint #9. (not recommended but it is possible)
- (Optional) Get the Keys from the foe you see. (only for the normal mode, not recommended but it is possible)
- (Optional) Return to Checkpoint #4, and Shop #2 or #3 in order, then quick transport the
- Kill the polar bear on the icy bridge and to proceed through the path ahead safely.
- After crossing the bridge, you will find a Super Snowy Cliff Faces with five buttons on the ground. Stepping on each button will toggle a couple of lights, and when all the lights are on, a wall will open up revealing the Checkpoint #5. (A)
- (Optional) For Digging Spot #14, turnaround from the Checkpoint #5, hop down the mountain to find the digging spot. (B)
- (Optional) For Hidden Room #9 and #33-38.
- From Checkpoint #5, throw a bomb to the wall to your right, it is the portion of the wall before going around the corner, before the icicles start falling upon you.
- It will reveal the Hidden Room #9 (Master of Secrets, World 2: Before bombing an icicle).
- Collect the six blue baubles inside the room quickly as several icicles will fall down #33-38. Exit the room.
- Continue forward, there is a banana dancing around these icy corridors. Kill it and jump up the ledge on the right wall.
- Then running along the ledge on the wall to the #39.
- Use the Slingshot or Mini Bombs to target three cracks around the large icicle. It will make a chunk fall and pierce the ground underneath. You can also use Shatter Serenade 1 3 3 1 3 3 to make it fall.
- Continue to the Checkpoint #6.
- Storm Top 5-6 map.jpg
Map
- Storm Top light puzzle 1.jpg
(A) Light Puzzle and Checkpoint #5

(B) Digging spot #14
- Storm Top Hidden Room 9.jpg
Hidden Room #9:
Before bombing an icicle 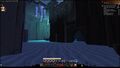
Hidden Room #9 (to be move)


Checkpoint 6 to Checkpoint 7[edit]
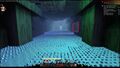
- In front of you is a long corridor with ice spikes on the ground, walls that blow wind, two bananas in the corridor, and the Frozen Waterfall at the end.
- Digging Spot #16 is near the beginning of the path is a safe square without any spikes in it. (A)
- Digging Spot #17 is close to the Frozen Waterfall. (B)
- #40 is next to an exploding barrel.
- (Optional) For Hidden Room #10-11 and the unlocking of the Shatter Serenade 1 3 3 1 3 3.
- At the middle of the corridor, play 3 3 2 3 3 1 to open a section of the right wall and reveal the Hidden Room #10 (Master of Secrets, World 2: The beginning of a frozen maze). (C)
- Run up the ledges and towards the back wall. In front of you is maze.
- Enter through the second to last entrance. Then go left, right, right and continue straight till you enter a large room filled with bananas.
- You must kill them all to reveal the Hidden Room #11 (Master of Secrets, World 2: This is bananas). (D)
- Inside the hidden room there is a villager and the Shatter Serenade 1 3 3 1 3 3 on the wall. Play the notes to learn the song. Head back to the frozen maze.
- At the middle of the corridor, play
- Go past the Frozen Waterfall at the end of the corridor to reach a room where a banana is dancing around. Kill the banana, collect the #41.
- Head up the icy hill to another light puzzle. However, in this puzzle, there are goats jumping around, turning buttons on and off. If they hit you, you will lose health so be careful as you do the puzzle. When successful, a wall will open revealing the Checkpoint #7. (E)
- (Optional) Before continuing, jump onto the second row of lights from the bottom and use a bomb on the right-hand wall above the snow ledge to reveal the
 Hidden Furniture Shop #1 (Master of Decor, World 2: #?@!). (F)
- Storm Top 6-7 map.jpg
Map
(A) Digging spot #15

(B) Digging spot #16
- Storm Top Hidden Room 10.jpg
(C) Hidden Room #10:
The beginning of a frozen maze - Storm Top Hidden Room 11.jpg
(D) Hidden Room #11:
This is bananas - Storm Top light puzzle 2.jpg
(E) Light puzzle 2: Activate only the starred pads, and the goats will take care of the rest.
- Storm Top Hidden Furniture shop 1.jpg
(F) Hidden Furniture shop #1: #?@!


- -
- -
- -
- -


Checkpoint 7 to Checkpoint 8[edit]
- At the Checkpoint #7, before dropping down to the long icy slope.
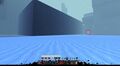
- Continue forward, drop down to the long icy slope filled with spikes on the bottom and a few polar bears up to the top.
- Make your ways to the top of the icy slope to the Checkpoint #8, #44-48 are resting on ledges on your way up.
- Storm Top 7-8 map.jpg
Map
Checkpoint 8 to Checkpoint 9[edit]
- At the Checkpoint #8
Activate three Happy Clouds to have the rainbow bridge ready for later, then position yourself between the second and the third Happy Cloud. Drop down on the snowy platform below, where two of the icy bridges intersect. Go ahead and quickly cross the next icy bridge, as it will collapse under you. Jump from cloud to cloud, keeping in mind that the larger clouds will disolve soon after you have stepped on them. Jump all the way up to reach a snowy platform with a blue bauble
- At the Checkpoint #9 (Backtrack)
- (Optional) For #52, Hidden Room #12-15, and the
 Moto's Finger.
- From Checkpoint #9, head back two platforms, to the later section of the platform with the Frozen Waterfall.
- Get the Wooden Whistle ready, you will need it to open a wall at the end.
- This series of jumps are tricky as the clouds dissolve fairly fast and it is very hard to see them with the default graphical settings.
- You can decrease your gamma in
Options → Graphics Options → Full-Screen Gammato make it easier. Make sure your resolution is set to full-screen.
- Get the
- From this platform you must jump as carefully and as quickly as you can, jumping from dissolving cloud to cloud.
- There is more than one valid path (there's a 90° bend in the series of clouds in the middle with a few different clouds quite near each other), so here's a few ways of counting it:
- Take a right on the first split of the clouds, a left on the second split, and a left on the third split.
- Go 7 to the right, 6 to the left.
- This should land you on three clouds before a closed wall where you will need to play 3 3 2 3 3 1.
- Since it takes a while to start playing the Wooden Whistle, it is important that you play a note—any note—before you arrive on these three clouds, else you will run out of time.
- The notes do not need to be played out in full, so it is okay if you just spam the notes. Otherwise, it is recommended to play two notes per cloud before hopping over on another.
- Since it takes a while to start playing the
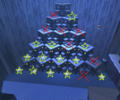
- When successful, this should open the wall, revealing the Hidden Room #12 (Master of Secrets, World 2: Perform a melody without falling). Get the #52.
- Use a bomb on each directions to revealing the Hidden Rooms.
- Hidden Room #13 (Master of Secrets, World 2: After performing, left) is on your left. This room is a Shop #4
- Hidden Room #14 (Master of Secrets, World 2: After performing, straight ahead) is in front of you. This room is full of exploding barrels and the Moto's Finger sitting in the right corner.
- Hidden Room #15 (Master of Secrets, World 2: After performing, right) is on your right. Unfortunately, there are no exit from this room, aside from dying.
- Storm Top 8-9 map.jpg
Map
- Storm Top Hidden Room 12-15 1.jpg
Unlock the Checkpoint #9 and turnaround, follow the jumping goat
- Storm Top Hidden Room 12-15 2.jpg
Cloud path to Hidden Rooms #12-15
- Storm Top Hidden Room 12-15 3.jpg
Hidden Rooms #12-15 with a Bomb Location for Hidden Room #13
- -


Shop #4 items[edit]
| Item | Cost | Description |
|---|---|---|
| 25 |
Used for opening chests. | |
| 500 |
This tote bag will allow you to hold up to 750 baubles. | |
| 5 |
Restores one heart. | |
| 20 |
Grants one extra life. |
Hidden Room #14 (Moto's Finger)[edit]
| Item | Cost | Description |
|---|---|---|
| free | Moto uses his finger to flick your foes into a fiery missile of destruction. |
Checkpoint 9 to Checkpoint 10[edit]
- At the Checkpoint #9
- Head to the left and jump up the platform past the three polar bears to get a blue bauble #53.
- Run past them to more clouds. Jump all the way across (some of them will dissolve) to reach a snowy area with spikes.
- At the room full of ice spikes.
- (Optional) For Hidden Room #16, Glitch, and a shortcut to Checkpoint #9.
- Keep to the wall on the right until you reach a small area with no spikes and play 3 3 2 3 3 1 to open the wall revealing the Hidden Room #16 (Master of Secrets, World 2: Perform a melody in a room full of ice spikes) and two portals.
- Take the entry portal, which will bring you to a similar looking room and open the wall with the Glove of Wisdom to unlock a shortcut to Checkpoint #9.
- This room also has the Glitch for this zone (this glitch can also be reached by taking the easy route, then jumping over the checkpoint from the yeti island and backtracking).
- Head back to the room full of ice spikes by taking the portal.
- Keep to the wall on the right until you reach a small area with no spikes and play
- (Optional) For Digging spot #17, dig at the center of the room.
- (Optional) For #54-57
- Go to the right and use the Glove of Wisdom to move the block until it locks into place.
- Jump to the two blocks in the middle and hit them until they lock into place as well. Use the blocks to climb the ledges and use 1 3 3 1 3 3 to bring down three large icicles and reach four blue baubles.
- #54-55 are on non-icy ledges.
- #56 is near a banana
- #57 is on a tall twisty pillar near the bridge to Checkpoint #10.
- Go to the right and use the
- (Optional) For #58 (Locked Chest #4)
- If you dropped your Key (#4) at the Checkpoint #8, bring it here.
- For Exploration Mode, use the rainbow bridge (the one created when you activated three Happy Clouds in this area), and get your key.
- Follow the whole rainbow bridge this time to reach a snowy platform with a banana and the last Happy Cloud to Checkpoint #10.
- Drop down slightly to the right to open the Locked Chest #4 and get a purple bauble #58.
- For Exploration Mode, use the rainbow bridge (the one created when you activated three Happy Clouds in this area), and get your
- For Normal Mode and in case of not having a key.
- (Optional) Back to the Checkpoint #9 and Hidden Room #14 in order to purchase a key by using the shortcut from Hidden Room #16 mentioned above.
- (Optional) Try to kill bananas around the chest.
- If you dropped your
- (Optional) For #59
- Jump on the square snowy platform above the chest. Facing the direction of the chest, you will see ledges on the wall to the right (adjust your camera to see a small snow covered one around the corner).
- Carefully scale the wall around to the right going from ledge to ledge reaching a snowy platform with a banana.
- Kill all the bananas so they do not interfere with you.
- Go back to where the first banana was and climb up the ledge, using a dodge jump to reach the square platform, then jump to the ledges nearby and climb to the top of the snowy platform.
- Cross from it to a ledge that will let you get to the other side where more dancing Bananas are.
- Make your way to where the second Banana is, kill it then turn around to find a small back room with a yellow bauble #59.
- (Optional) For Digging spot #18
- Before the ice bridge on approach to the Checkpoint #10, jump up the ledges to the right to get to the very top (dodge jumping is required for the ledges near the top).
- From there jump to ledges on the right, and continue around the platforms above the icicle puzzle. Jump around to the very far, back corner. Dig on gray/black block.
- (Optional) You may skip above process by using 1 3 3 1 3 3 to make the large icicle and crossing the bridge to the Checkpoint #10.
- Storm Top 9-10 map.jpg
Map

Hidden Room #16:
Perform a melody in a room full of ice spikes
(Entrance to Glitch)
Glitch
Digging spot #17

Digging spot #18


Checkpoint 10 to Checkpoint 11 (Yeti)[edit]
- At the Checkpoint #10
- (Optional) For #60-63, go to each corner of the large, lower ice platform.
- (Optional) For Hidden Room #17
- Face the pyramid. Head left to the corner of the lower ice platform where there is a snowy square against a gray wall.
- Play 3 3 2 3 3 1 to open the Hidden Room #17 (Master of Secrets, World 2: Perform a melody near the yeti mountain), which contains several barrels filled with
 food.
food. - The block of ice can be shattered using 1 3 3 1 3 3 to free the Raccoon that is part of Super Adventurer's Quest 2.
- (Optional) For Hidden Furniture shop #2
- Face the pyramid, but this time drop down just to the right of the checkpoint onto a narrow snow ledge.
- Work your way around the pillar to the right and toss a bomb at the back wall to find the Hidden Furniture shop #2 (Master of Decor, World 2: Under the pyramid of pain).
- There are falling icicles inside which will immediately drop on you, so be prepared to move as soon as you load in.
- Head towards the pyramid.
- Yeti mini boss

- You will have to scale an icy hill to reach the Yeti. It has three attacks:
- Rolls eight snowballs down the hill. Easily avoidable.
- Throws snowballs. Same as before.
- Claws you. Only used when you get into nearby range of him.
- Stand near the top of the hill on the snow ledges and wait for him to stop rolling snowballs, and once he stops, run up the hill and attack him. The hill is icy along with the sides of the hill except for certain parts that are made of snow, use these to climb your way up the hill to the Yeti.
- After the fight
- Upon defeating the Yeti, it will drop a red bauble and a portal will appear at dead center of the top of the hill. Enter the portal to find the final checkpoint.
- (Optional) Before teleporting to Storm Wizard. There are 2 possible ways of reaching Digging spot #19.
- (Optional) Get pushed up by the checkpoint and land on the left column, dodge jump to the platform left of the teleporter then drop down on the icy patch.
- (Optional) Jump around on the back side to the icy patch.
- Storm Top 10-11 map.jpg
Map
- Storm Top Hidden Room 17.jpg
Hidden Room #17:
Perform a melody near the yeti mountain - Storm Top Hidden Furniture shop 2.jpg
Hidden Furniture shop #2: Under the pyramid of pain

Digging spot #19

Boss (Storm Wizard)[edit]

.jpg)
The final boss for World 2: the Storm Wizard. There are two phases to this boss which are as follows:
Phase 1: You will need to use the ![]() Glove of Wisdom to block the Storm Wizard's energy hand projectiles and reflect the attack back at him. This will remove his shield and cause him to go a little crazy, allowing players to attack him for a short time before he regains his calm and shield. Continue this pattern until he is out of health.
Glove of Wisdom to block the Storm Wizard's energy hand projectiles and reflect the attack back at him. This will remove his shield and cause him to go a little crazy, allowing players to attack him for a short time before he regains his calm and shield. Continue this pattern until he is out of health.
Phase 2: Players will need to jump around the different platforms avoiding the Lightning Ball and the dragon's lightning attack. The energy sparks will chase players around and will sometimes disappear after a bit, while others will keep on chasing you, though they can be killed in one hit. When the Storm Wizard Dragon roars, he initiates his lightning attack, so stay off of the center platform. After his attack, he flies downward and then comes back up hitting one of the outer platforms, so it is best to keep moving around to avoid being knocked off the platform and losing health or a life. Once he does this, the lightning will disappear from the center and you can run there and wait for the dragon to come rest in the center platform, where he can be attacked. Repeat at least one to two more times to defeat the Storm Wizard.
- Tips
- You can stun lock the boss in the first phase with
 Whip or
  Boomerang once the invulnerability has been removed by blocking an attack with Glove of Wisdom.
 - To avoid being on the platform that the Storm Wizard destroys, either jump on a Rainbow Bridge (Exploration Mode only) or jump around between the outer platforms, as he tends to target whatever platform players were on first when he dives down.
- Upon defeating the Storm Wizard for the first time.
| Item | Cost | Description |
|---|---|---|
| free | Health Vessel: Gives you an extra heart. |
- Storm Top 11 map.jpg
Map
Achievements[edit]
- For Tribulation Mode achievements, see: Storm Top/Tribulation Mode#Achievements
| Master of Baubles, World 2 | Super Adventure Box: World 2 | 5 |
|---|---|---|
| Collect every World 2, Zone 3 bauble in one playthrough. Baubles from foes aren't counted.Deep pockets required. | Collect All Baubles in World 2, Zone 3 | 5 |
| Master of Coins, World 2 | Super Adventure Box: World 2 | 5 |
|---|---|---|
| Get a Gold award in each time challenge Adventure in World 2. | 3 Adventure Gold Awards in World 2 | 5 |
| Super Adventure Box: World 2 | 6 | |
|---|---|---|
Find all the furniture shops in World 2. Completing this achievement along with the one for World 1 will unlock a vendor tab on Motos' assistants.Only the finest from the finest.
|
Found 2 Furniture Shops in World 2 | 2 |
| Found 4 Furniture Shops in World 2 | 2 | |
| Found 6 Furniture Shops in World 2 | 2 |

| Master of Secrets, World 2 | Super Adventure Box: World 2 | 5 |
|---|---|---|
| Find every hidden room (excluding furniture shops) in World 2, Zone 3.What was hidden is now revealed. |
17 Hidden Rooms Found World 2, Zone 3 | 5 |
| Professional Ice Skater | Super Adventure Box: World 2 | 5 |
|---|---|---|
| Complete World 2, Zone 3 without being frozen by a banana.So graceful. | Complete World 2, Zone 3, Without Being Frozen by a Banana | 5 |
| Unintended Coursework | Super Adventure Box: Nostalgia | 10 |
|---|---|---|
| Destroy all of the glitches in Super Adventure Box.Maybe it's more of a misplaced feature. |
Destroyed 6 Glitches | 10 |