Hexfoundry Unhinged
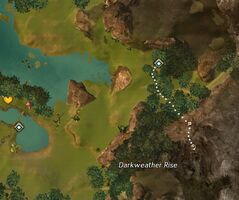
Map of Hexfoundry Unhinged
| Image(s)
|
|
Click to enlarge.
|
The Hexfoundry Unhinged is a jumping puzzle located in the Darkweather Rise in the south-eastern part of Sparkfly Fen that contains two chests. It appears to have been an Inquest lab and several terminals in the area give insight as to what may have caused its destruction.
Getting there[edit]
South-east of the  Darkweather Waypoint — , behind the Inquest
  Inquest Hexfoundry G-14 — Point of Interest.
Walkthrough[edit]
Spoiler alert: The hidden text contains spoilers relating to the solution to the Hexfoundry Unhinged jumping puzzle.
|
- Introduction and notes
- The goal of this jumping puzzle is to disable three Inquest Switches that are powering force fields blocking the final Grand Chest. This walkthrough will take you through all three switches.
- Each numbered step corresponds to one of the walkthrough images (numbering is on the bottom right of the images for reference).
- The switches remain disabled for about 30 minutes, so it is possible that some or even all of the force fields are still disabled.
- If all the force fields are disabled, then you can simply glide towards the end (refer to step #7 below for the path).
- If not all the force fields are disabled and you are familiar with the puzzle, then refer to the corresponding switch and force field below:
- Switch #1 - middle
- Switch #2 - closest to chest
- Switch #3 - farthest from chest
- Pads with a single symbol on the corners can be jumped on. Pads with two symbols are too steep and you will slide off.
- Start to switch #1
- (1) Glide to the hole in the wall, or jump along the pads. If jumping, jump directly to the first pad instead of walking down the slope. The slope is steep and you will slide.
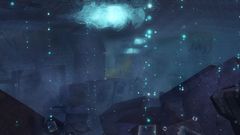
- If you fall in the water use the following steps:
- (a) Swim towards the lights.
- (b) Continue following the lights, walking up the ramp. You will now be at the same spot if gliding/jumping without falling.
- (2) Go up the ramp.
- (3) Jump to the ramp in front and walk to the corner.
- (4) Jump down to the next ramp in front and interact with switch #1. Then jump down to the ledge.
Start to switch #1 - Step 1
Start to switch #1 - Step 1a
Start to switch #1 - Step 1b
Start to switch #1 - Step 2
Start to switch #1 - Step 3
Start to switch #1 - Step 4
- Switch #1 to switch #2
- (5) Jump down to the rocky surface, then walk and jump up the sloped surfaces until you reach the upper platform. If you fall in the water, there is a ramp underneath that will bring you back to the rocky surfaces.
- (6) Glide to switch #2, or jump along the pads. If jumping, be careful to not fall through the middle of the pads, or the gaps in the edges. Interact with switch #2. If you fall in the water, go back to step #5.
Switch #1 to switch #2 - Step 5
Switch #1 to switch #2 - Step 6
- Switch #2 to switch #3
- (7) Jump along the ramps and ledges on the wall. You will walk across the Grand Chest, blocked by a force field. If you fall in the water, there is a ramp below that will lead up back up.
- (8) Glide or jump on the pads to the scorched marks. If you fall in the water, refer to step #7.
- (9) Jump along the sloped surfaces, to the hexagon patterned surface. Be careful of the hole right before the hexagon surface. If you fall in the hole, refer to steps #12a-c.
- (10) Continue up the sloped surfaces. There will be a Veteran Flesh Golem at the top.
- (11) Switch #3 will be at the top, interact with it.
Switch #2 to switch #3 - Step 7
Switch #2 to switch #3 - Step 8
Switch #2 to switch #3 - Step 9
Switch #2 to switch #3 - Step 10
Switch #2 to switch #3 - Step 11
- Switch #3 to end
- (12) After disabling switch #3, it's time to backtrack to the Grand Chest you saw earlier in step #7. Head back down and jump along the sloped surfaces, which will bring you back to the scorched marks. Then refer to step #7 to get to the Grand Chest. A Veteran Mark I-B Golem may appear.
- Alternatively, there is a chest at the bottom of the hole. The following steps can be used if you decide to get this chest.
- (a) Loot the chest in the hole, then follow the lights.
- (b) You will be at a tunnel with laser traps. Proceed past the traps, being careful as they do hurt.
- (c) After the laser traps, there will be an underwater tunnel to swim through. It will bring you right to the ramp that will lead you to the end (refer to step #7).
Switch #3 to end - Step 12
Switch #3 to end - Step 12a
Switch #3 to end - Step 12b
Switch #3 to end - Step 12c
|
- Chest - found between the third switch and fourth terminal.
- Grand Chest - end chest protected by three force fields, which are powered by the Inquest Switches found throughout the lab.
- Golem
- Risen
- Minion
Objects[edit]
- Interactive
Related achievements[edit]
- The achievement for this puzzle was added with the Halloween update 2012.
- Because of the Veteran Mark I-B Golem appearing at the final chest, this may be a little awkward to park at.


 Jumping Puzzles: Hexfoundry Unhinged — Complete the jumping puzzle. (10
 )
) Daily: Daily Hexfoundry Jumping Puzzle — Complete the Hexfoundry Unhinged jumping puzzle in Sparkfly Fen. (0
 ) (Historical) (when applicable)
 HOPE III: Prototype:
  Hexfoundry Crystal Charge — Use the Empty Branded Crystal to gain a crystal charge near the chest of the foundry under Darkweather Rise in Sparkfly Fen.
 Inquest Security — Make your way through the defenses of the Inquest Hexfoundry G-14 in Sparkfly Fen.
 Arborstone: Golem Behavior Analysis — Complete 4 behavior scans in Tyria. (3
 )
)