Scarlet's Secret Lair
Scarlet's Secret Lair

Map of Scarlet's Secret Lair
- Type
- Instance
- Area
- Durmand Priory
(Lornar's Pass) - API
- 964

Loading screen
| Image(s) |
|
Click to enlarge. |

Scarlet's Secret Lair is one of Scarlet Briar's workshops. This one is located in the cave system underneath the Durmand Priory, behind a holographic wall concealing the entrance and is filled with her designs, drawings, journal segments and souvenirs from her campaigns across Tyria.
Location[edit]
Getting there[edit]
From the ![]() Durmand Priory Waypoint — , exit the building and head to the west (near the asura gate). From there, jump over the railing at the edge of the structure. There should be a group of Frost Bats close to the entrance of a cave to your right. Enter this cave and continue past the Ice Wurms at the
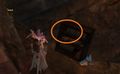
Durmand Priory Waypoint — , exit the building and head to the west (near the asura gate). From there, jump over the railing at the edge of the structure. There should be a group of Frost Bats close to the entrance of a cave to your right. Enter this cave and continue past the Ice Wurms at the![]() Posternus Caverns. At the fork, take the right (east) tunnel leading down to a fake holographic wall guarded by a Veteran Cave Troll, concealing the entrance door to Scarlet's Secret Lair.
Posternus Caverns. At the fork, take the right (east) tunnel leading down to a fake holographic wall guarded by a Veteran Cave Troll, concealing the entrance door to Scarlet's Secret Lair.
As of the Battle for Lion's Arch (2022) release, the instance can only be accessed when the story segment Scarlet's Secret Lair is available. The fifth episode of Living World Season 1, The Battle for Lion's Arch, needs to be active and progressed up to (or repeating) the second story step Connecting the Pieces, and ![]() Scarlet's Secret Lair, the first segment in the step. There will be a story marker at the door to interact with and enter the instance. When the segment is not active, interacting with the door will still display the same prompt, but nothing will happen.
Scarlet's Secret Lair, the first segment in the step. There will be a story marker at the door to interact with and enter the instance. When the segment is not active, interacting with the door will still display the same prompt, but nothing will happen.
Objects[edit]
- Bottle of Anguish (Empty) (For Coalescence II: The Gift collection)
- Console
- Notes on the Marionette
- Scarlet Briar's Journal, 1st Fragment
- Scarlet Briar's Journal, 2nd Fragment
- Scarlet Briar's Journal, 3rd Fragment
- Scarlet Briar's Journal, 4th Fragment
- Scarlet Briar's Journal, 5th Fragment
- Scarlet's Prototype Mechanism (The Predator I: The Experimental Rifle collection required)

Text[edit]
- Interacting with Energy Probe model on desk
- This seems to be a miniature prototype for the probes scattered across the countryside. This one is off, but the others are much larger and have an unsettling red glow.
 Leave it alone.
- Interacting with antitoxin injector
- One of the antitoxin injectors from the Tower of Nightmares. Scarlet must have stolen or recovered it in the chaos of the tower's destruction.
- She must have taken an interest in how this stuff killed the tower...
- Interacting with the portrait of Headmaster Omadd
- An old-looking asura's portrait has several knives plunged into it. The bottom appears to have the subject's name engraved: Professor Omadd.
- She seems to not have been a fan of his.
- Interacting with a chart of potential faction alliances
- This rough diagram appears to chart connections between various factions. Scarlet must have been brainstorming which forces she could manipulate into alliances for her benefit.
- Good thing most of these seem to have fallen through.
- Interacting with a diagram of a rocket dolyak
- The combination of a dolyak and some sort of thruster seems to have been rejected at the drawing board.
- I guess they can't all be winners.
Gallery[edit]
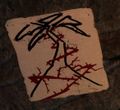
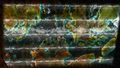
Thorned red vines strangle a tree.

Prototype Mechanism of an Energy Probe.

Scarlet Briar's Journal, 1st Fragment, Notes on the Marionette and a diagram of the Twisted Marionette's head.
Empty Bottle of Anguish on the shelf.


_location.jpg)
_object.jpg)
- Scarlet's Console
The chair and console at the back of the room.
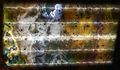
Screen one of Scarlet's Console: depicting locations of probes.
Screen two of Scarlet's console: more depictions of probe locations.

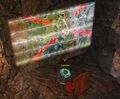
Screen three of Scarlet's console: Vigil Keep, Durmand Priory, Chantry of Secrets, Lion's Arch marked by red X's.
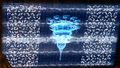
Screen four of Scarlet's console: apparent plans for a drilling device.
_location.jpg)


Notes[edit]
- At the back of the room, there is a console in front of a powered-down holographic screen. If you enter OMADD into it, the screen will light, displaying maps of Tyria, showing the Energy Probes represented with black markings, and red X marks over the Vigil Keep, Durmand Priory, Chantry of Secrets, and Lion's Arch (seemingly Fort Marriner), as well as plans for a device that appears to be a drill.
Related achievements[edit]
 The Origins of Madness: The Secret Lair — Discover Scarlet Briar's secret lair. (1
 )
) The Battle for Lion's Arch: Investigative Study 5 — Find and read sources of information on Scarlet's scheme and its fallout during the episode "The Battle for Lion's Arch." (1)
 Coalescence II: The Gift:
  Bottle of Anguish (Empty)
  The Predator I: The Experimental Rifle:
  Scarlet's Prototype Mechanism — Find the prototype mechanism left behind in Scarlet's hideout in Lornar's Pass.
Trivia[edit]
- Added with The Origins of Madness release.
- Originally, to enter the lair for the first time, you had to unlock the door with a Power Core, created by combining 50 Power Core Components. Finding the lair would award 10 Power Core Components, and one would need to bring an additional 40 in order to enter.
- The original dialogue with the door was as follows:
- The door mechanism requires a special type of power core before it can be opened.
 Connect power core.
- Leave.
- There was a spike trap next to the entrance/exit; it caused cripple, but did no damage.
- There used to be five lootable chests in the instance, each of which had to be opened once in order to obtain all of the journal pages.
- The chests were removed following the end of the original living world release, and the journal page items were replaced with freely accessible objects.
- There are also several non-interactive items of interest:
- Copies of a drawing that depicts red roots strangling a tree (similar to the vision she described in her last conversation with the mother tree).
- A picture of Headmaster Omadd, Scarlet's former mentor whom she killed, with sharp objects thrown and stuck into it much to the effect of a dartboard. The picture has two knives in his eyes and two gashes in the picture.
- A dragon-like cave painting stretches from the tail in the north corner of the room, to the ceiling and the opposite wall where the head is. You can actually see a second dragon head if you look at the middle of the painting.
- A mundane chart on one wall with many different races of Tyria on either side, and lines connecting them. The only lines not scribbled out with red are the ones connecting a Nightmare Court sylvari and krait (Toxic Alliance), an Inquest asura and a humanoid pirate (Aetherblades), and a Flame Legion charr and dredge (Molten Alliance). The centaurs, kodan, largos, and krait on the Chart of Alliances are the only ones to have been considered twice for an alliance.
- The Twisted Marionette's weapon design is on the wall above Scarlet's Lockbox.
- There is a diagram of a dolyak with rockets attached to it on a column.